Where Do I Go to Get an Alternator Replaced
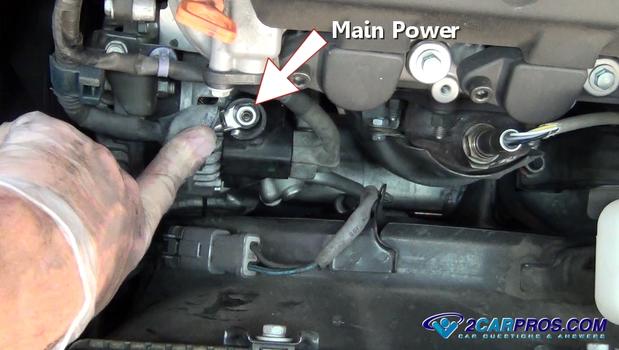
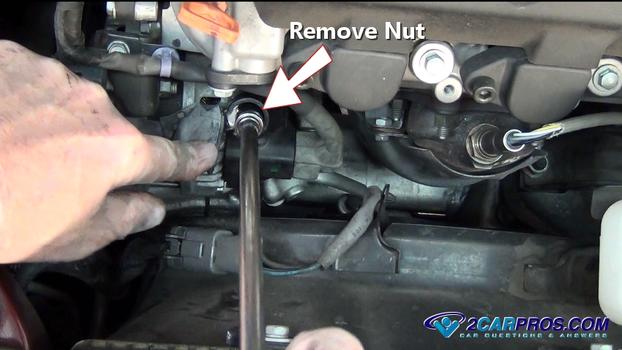
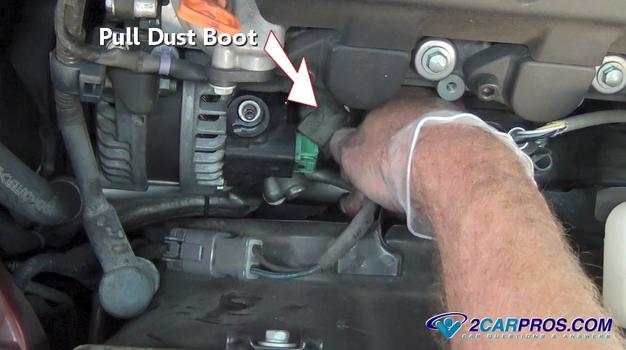
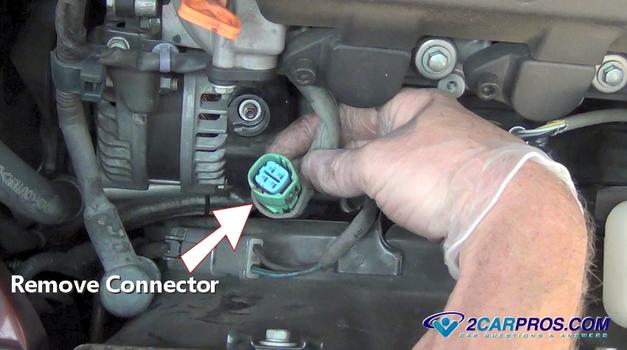
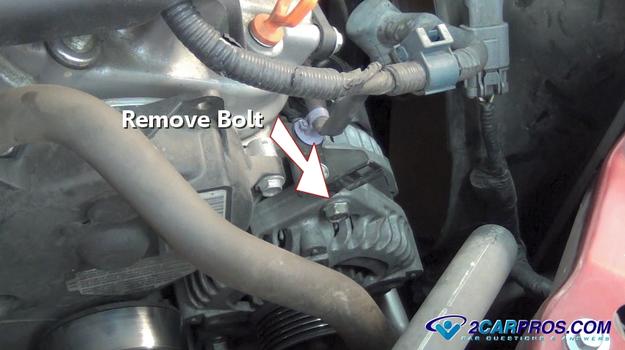
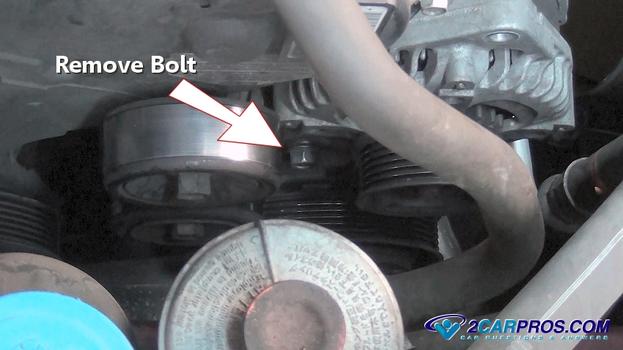
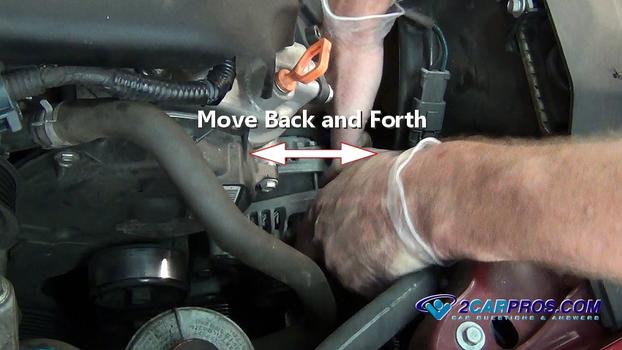
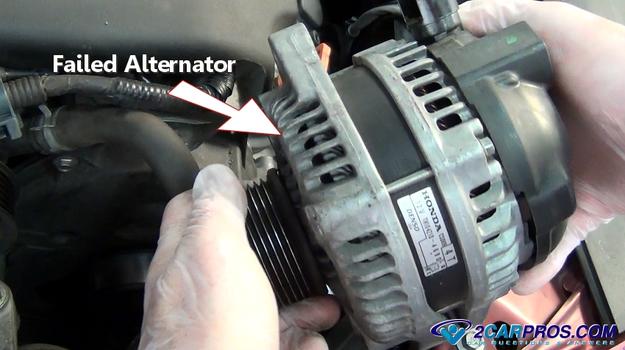
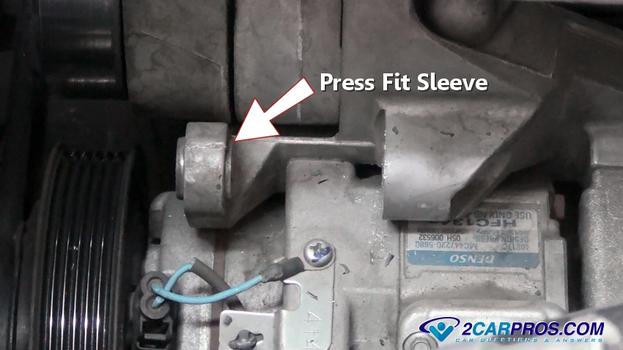
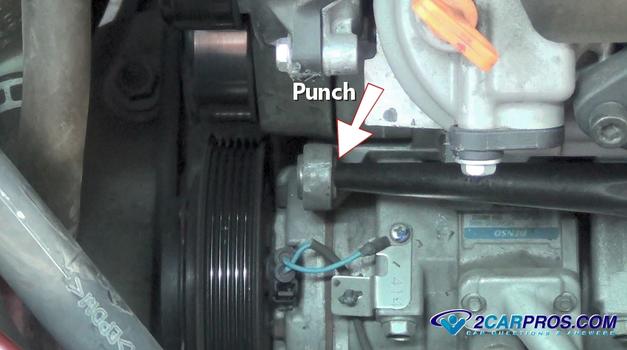
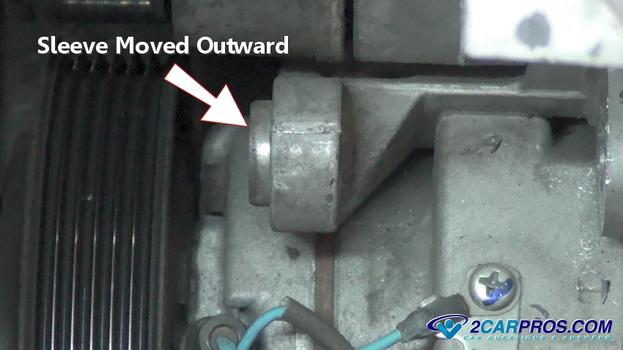
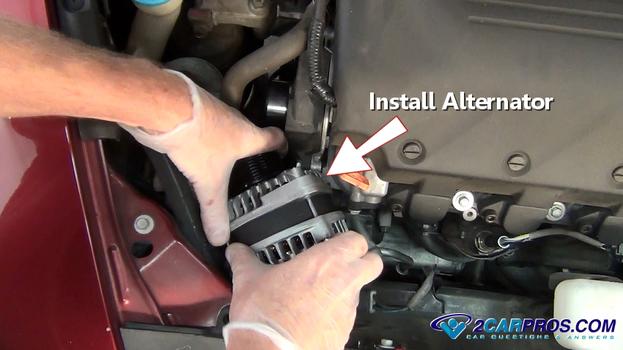
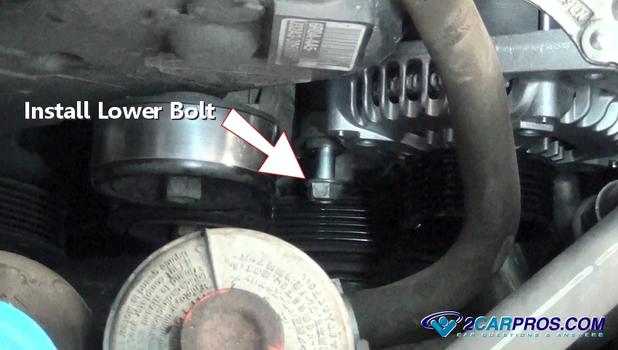
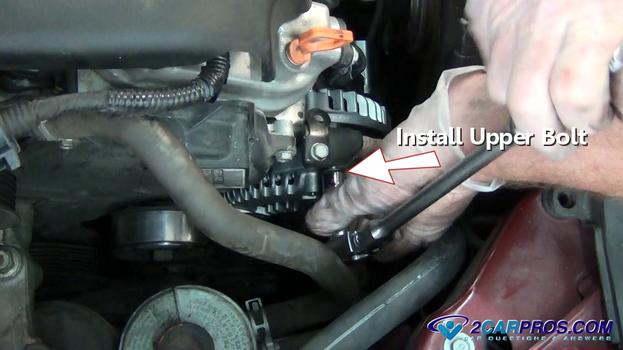
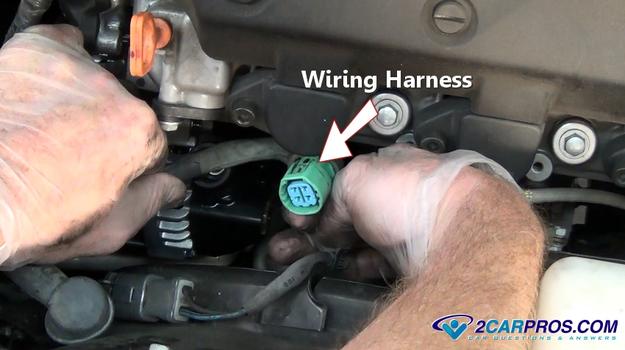
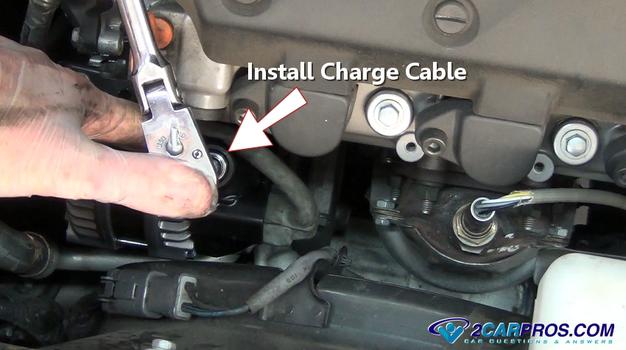
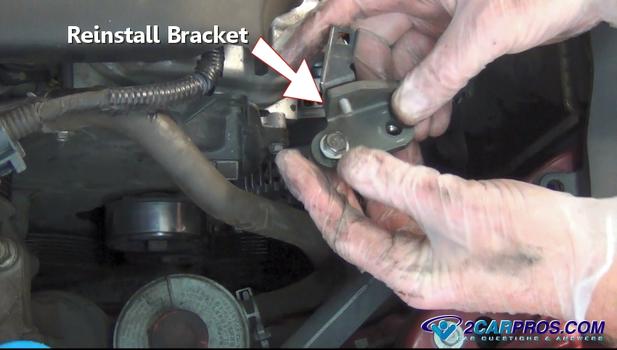
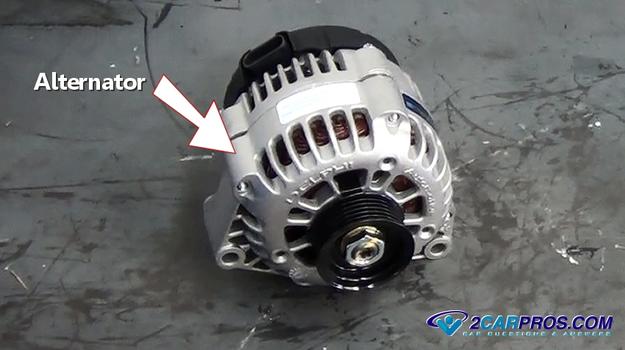
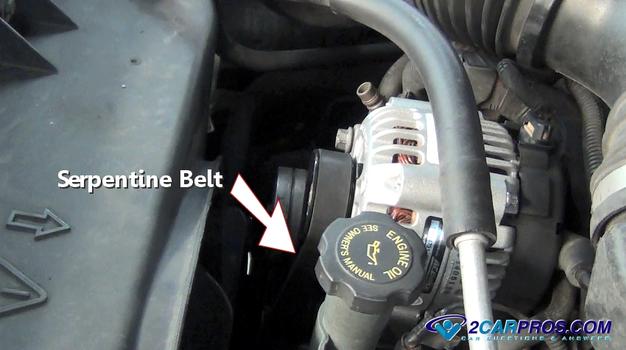
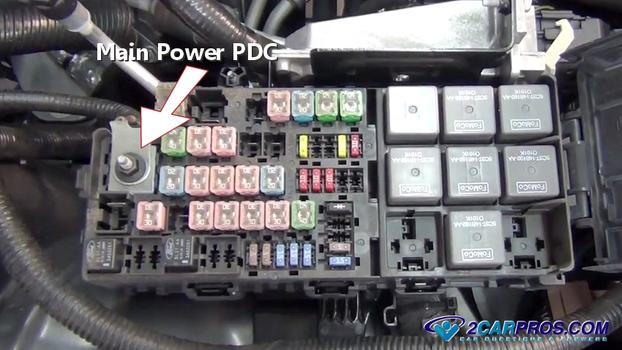
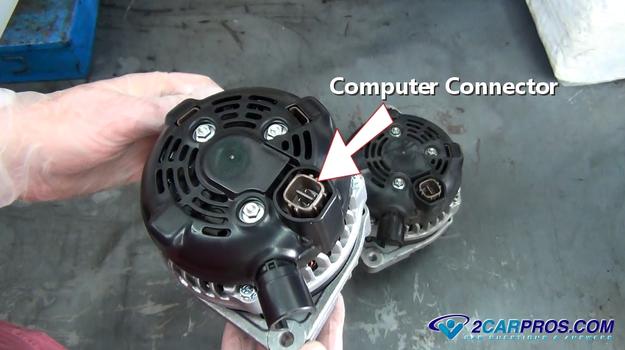
Got a reddish barrage warning light on? This most likely means the alternator has gone come out of the closet and needs to be replaced. This is a common problem for most vehicles and you can replace it in about an hour. We are a team of ASE certified mechanism and have created this conduct to help you save money by doing the job yourself or at least eff what you are paying for when taking your vehicle to the service department for repair. Before changing the alternator be convinced to test it to sustain its failure. An alternator works on the principle of electromagnetics. By turning a magnetised armature inside a cable field it testament produce Alternating current (alternating current) voltage. A series of diodes (6) convert Atomic number 89 to DC voltage which is needed for the car electrical plant and the barrage. The armature is pendent by two sealed bearings on either remnant of the housing. Potential is then transferred to a main terminal at the rear of the housing via a spring crocked thicket set. The alternator can flush it in one of two ways, either the physical phenomenon section of the unit stops working due to heat and all over usage operating theater the bearings can fail causation the alternator to make noise and eventually lock up. When this happens the serpentine knock will break or jump from the alternator pulley. A common problem is undercharging. This condition is often accompanied past symptoms so much A a battery warning light, low state of battery lodge, poor or changeful public presentation from physical phenomenon components and at last the engine volition shut fine-tune. SPONSORED LINKS Park your fomite on layer ground with the engine off with the emergency brake set. Utilise basic tools patc tiring eye protection and gloves. Locate the alternator under the hood, information technology will be near the front of the engine either on top or the nethermost. If required rear the vehicle using a floor jack and secure it with jackstones stands. Loosen and slay the negative battery cable and so promote the cable away from the terminal to avoid accidental connections. Sometimes the transmission line leave want to wander backrest over to the final. This tone is to take out electric power from the vehicle to ward of brusk circuits when working with the of import wiring rule. Avoid removing the positive cable end because you can cause to suddenly through the wrench to the body or an accessory. Record the radio presets if you want to rhenium-enter them when the job is complete. The serpentine belt will too need to be removed. Locate the belt tensioner and hold reverse tension against it using a wrench, socket or breaker bar. This will allow the belt to be removed from the alternator pulley. Once the belt has been removed inspect it for cracks and glazing because nowadays would be a proficient time to replace IT with a refreshing one. This is a unspecialised outline and some stairs can live through out of order depending on application. Wrench or socket sizes needed: SPONSORED LINKS Begin by removing the detritus boot from the main power terminal to expose the main power wire. If the wiring is noncompliant to memory access you leave be able to disconnect IT once the alternator is slack from the engine. All alternators are designed with a briny power cable (large gauge) that is connected directly to the battery for intense charging purposes. Employment a socket or wrench to remove the nut by turn it left-handed. After the nut has been separate grasp the important power cable and rise up it from the alternator commission terminal. Locate the control and monitoring wiring harness connexion. Grok the dust boot and drag it back enough to access the connector safety clip. Any vehicles do not have a dot iron heel. SPONSORED LINKS Patc releasing the safety clip unofficially of the connector gently draw out to outward to remove the wiring harness. These connectors can be a little stuck because of the brave cachet which you might call for to wiggle to help slay it. Clear any hoses or wiring past removing mounting bolts or screws. Once consummated use a wrench operating theatre socket to remove the upper mounting bolt and square bracket. Settle and remove the lower mounting bolt. This bolt backside be tight so keep a operative grip along the wrench or socket while placing the wrench or socket firm on the head of the bolt to avoid rounding the dash pass. SPONSORED LINKS Afterwards the mounting bolt has been removed grasp the unit and move it back and forth while pull upwardl. This will help release the constrict fit (lower mounting bracket) used to gri the alternator in lay out. Once the old unit becomes baggy in the engine bay get a dear grip in thereon to gently lift and remove information technology. This step can take some trial and misplay while rotating the unit while extraordinary minor adjustments or relaxation a devotee shroud or a radiator hosepipe that may get in the path of the removal. Once removed, check the old gathering to the renewal whole. Comparability the electrical fire hydrant, mounting abscond locations and pulley size to ensure a proper installation. Also count the serpentine belt grooves on all of the pulleys, they should be the same. Lower mounting brackets include a imperativeness ready arm that moldiness be forced slightly outward to make room for the replacement whole. This step is Copernican because installing the new unit would beryllium identical thorny if not impossible without this tread. SPONSORED LINKS Employ a large punch or metal bar to gently hammer the sleeve outward. This can acquire a little finesse simply stay with it because it only necessarily to be moved a little bit to get new alternator installed. Here is a close up shooting of what the job should look into like when completed. Now the lower boss of the alternator housing will slip onto put together easily. Gently lower the replacement unit into the engine bay while being with kid gloves not the impairment any of the surrounding components such as the radiator. The radiator core is made of thin Al and IT can exist well damaged which would take the fun out of the job if you movement a leak. SPONSORED LINKS Now reinstall the lower mounting bolt. Leave the bolt turn over tight until the installation of the upper abscond. If you tighten the lower run off first the upper berth deadbolt might be difficult to install or bind which can cause the bolt to strip outer. Hand thread in the upper mounting bolt and constrain. Next tighten up the lower bolt as well. These bolts need to beryllium snug but don't over fasten which can cause the bolts to disrobe out especially the upper climbing go off because of its little size up. Take down bolt torsion specification is 30-40 pounds. Upper torque spec is 20-25 pounds. After the mounting bolts are tightened reinstall the computer wiring harness that monitors and adjusts the voltage turnout along with the safety weather boot. Be sure the connective is free from dirt and grease earlier reassembly. SPONSORED Golf links Reinstall the main charge cable and mounting nut. Lightly tighten the overseas telegram into place and behave not over tighten (3-5 torque pounds). This electrical terminal this ready-made of a stony plastic and is used as an dielectric which can break causing an internal short hindering the charging operation. Reinstall the rubber weather boot to keep any moisture from entering the connecter which will cause erosion and more problems further lowered the line. If the wring rein in has mounting clip reinstall them to keep the harness from wearing through and eventually connecting to ground which will blow the charging system fuse and possibly scathe the novel alternator. Reinstall any hoses or brackets separate in the replacement process. After the belt installment is fill in use a flashlight to check the position of the belt on each united of the accessory pulleys to make sure all of the belt ribs are correctly positioned. Reconnect the battery negative cable back up away gently touching the cable to the battery Emily Price Post. There should be a small spark spell installing the cable end to the concluding which is normal. If a large spark is generated the alternator charge cable has grounded and needs to be rechecked. Do not reconnect the battery telegraph until this problem has been fixed. It doesn't occur very often but it's something you should know about. SPONSORED LINKS When the job has been completed lead off the engine and detect the battery cautionary light which should be out. It's a good approximation to retard the original alternator's voltage output using a voltmeter. Hera is a video that shows you how to do the job above. An alternator is designed to ply electrical power (13.6 to 14.6 volts) to a vehicle when the railway locomotive is operating while charging the battery back down up for future utilise. SPONSORED LINKS A curving belt is used to cede revolution Energy Department from the locomotive engine via the main drive pulley. A large power terminal is used as the main potential dro feed to the physical phenomenon system which is usually connected to the incontrovertible bombardment post or fuse boxwood. This main world power feed is used to index circuits throughout the vehicle. SPONSORED LINKS Most units are designed with a built in voltage governor which supporte stabilise the voltage output. A wiring harness connection is misused past the computer PCM to control and monitor the voltage regulator during changeable engine speeds (RPM's) and voltage demands. There are various tools and supplies you will need throughout this article. We have created a tilt for you to gather these supplies if you do not have them already. Determine more: Tools and supplies required for an alternator replacement You will too need replenishment parts. We have got created a guide that will inform you every bit to where to go to bugger off the best deal and upper-class. Hear more: Alternator buying usher To see much specific information astir your finical vehicle check impermissible our mend manual data guide. Get word more: Alternator replacement manuals If you need more information along what you receive sensible seen or read please visit our forum where our mechanics have answered thousands of alternator questions approximately this subject or ask one of our mechanism, we are happy to help. SPONSORED LINKS Article published 2021-08-08 How Does It Work?
What Goes Wrong?
Acquiring Started
Let's Get it Fixed!
Pace 1: Removing the Alternator
Step 2: Matching Up the New Alternator

Ill-use 3: Reinstallation
How Alternators Work?

Best Practices
You might bump intriguing:
Got Any Questions?
Where Do I Go to Get an Alternator Replaced
Source: https://www.2carpros.com/articles/how-to-replace-an-alternator
0 Response to "Where Do I Go to Get an Alternator Replaced"
إرسال تعليق